Drawing Bézier Curves
A few months ago I’ve released my latest iPad app – Revolved. The core idea of Revolved is super simple – you draw curves on the right hand side of the screen and they get revolved around the axis to create a 3D model.
In this article I’m going to walk through the process of displaying Bézier curves on the iPad screen as it happens in the app. Since the line drawing engine powering Revolved is OpenGL based, presenting curves on the display is not as easy as calling some Core Graphics functions here and there.
To make the story more interesting I made a few interactive demos that should make understanding the presented concepts much easier. Here’s the small part of Revolved in your browser. This is what we’re going to build:
Note: the demos are made in HTML5 using the canvas API which (unfortunately) is not a match for the full-fledged OpenGL based rendering. While some small glitches and artifacts may occur in the browser, Revolved doesn’t suffer from those problems.
The OpenGL code powering the line drawing in Revolved is available on my GitHub. As an added bonus I’ve also published the canvas/JS version that runs the demos in this article.
Bézier Curves
I’m absolutely fascinated with Bézier curves. Not only are they ubiquitous in computer graphics, but also they’re just so much fun to play with. Dragging the control points and watching the curve wiggle is an experience on its own.
The most popular Bézier curves out there are cubic Bézier curves. They’re defined in terms of four control points. While the first and last control points specify locations of the endpoints of the drawn curve, the second and the third control points influence the tangency of the curve.
If you’re interested in mastering Bézier curves, I highly recommend diving into A Primer on Bézier Curves, which is the resource on the matter. However, this article doesn’t require any meaningful background apart from intuitive understanding of how the curves work.
Having decided to utilize the curves in Revolved, I’ve faced the challenge of rendering smooth cubic Bézier curves on the GPU, using the OpenGL primitives.
Subdivisions
One of the easiest way to approximate any curvy shape is to split it into line segments. We’re going to divide a Bézier curve into a set of connected linear components, with the intention that large enough number of segments will look sufficiently smooth for the user. The most important problem we have to solve is finding the connection points for those segments.
Fortunately, Bézier curves are parametric that is their x and y components are defined in terms of a parameter t, which varies from 0 to 1. For the value of t equal to 0, we land on the first end point of the curve and for the value of t equal to 1, we land on the last end point of the curve. For in-between values of t we get some points that lie on the curve in-between those end points.

Bézier curve parametrization
To approximate a shape of a Bézier curve using 2 line segments, calculate the position of 3 connection points for t equal to 0, 0.5 and 1. Using 10 segments requires 11 points for t values of 0, 0.1, 0.2, …, 0.9 and 1.0 respectively.
Subdivision in Action
The little simulator below depicts the method. Try dragging both end points and control points. You can adjust the number of segments with a slider. The faint gray line is the exact (hopefully) Bézier curve drawn with HTML5 canvas primitives.
A very nice feature of Bézier curves is that the subdivision points accumulate near areas of large curvature. Try making a V-shaped curve and notice how little red knots tend to stick together near the tip, they don’t divide the curve into equal-length segments. Moreover, even for a small number of linear segments the drawn shape is not far off from the exact curve.
Drawing Lines
Even though OpenGL does support line drawing, I didn’t want to use this feature for two reasons. First of all, the line width can only be set once per draw call. Animating curves' thicknesses would require separating the drawing commands into different batches thus potentially requiring multiple draw calls to render all the segments. This is unnecessarily complex.
The most important factor is that the lines rendered by OpenGL are plain wrong:

This is actual slanted line drawn by OpenGL
The “algorithm” seems to clone pixels in either horizontal or vertical direction, making lines look like parallelograms instead of rotated rectangles. Needless to say, this doesn’t fulfill my quality requirements. While simple line drawing would work for very thin lines, I wanted the curves in Revolved to be bold and prominently presented on the screen.
Adding Width
Having nailed approximating the shape of Bézier curves with line segments, we should focus on making them wider. Rejecting OpenGL line drawing method forces us to jump into the usual GPU suspect – a triangle. A single line segment will consist of two triangles that will form a quadrilateral. We just have to calculate 4 corner points for a given segment and connect them with edges:
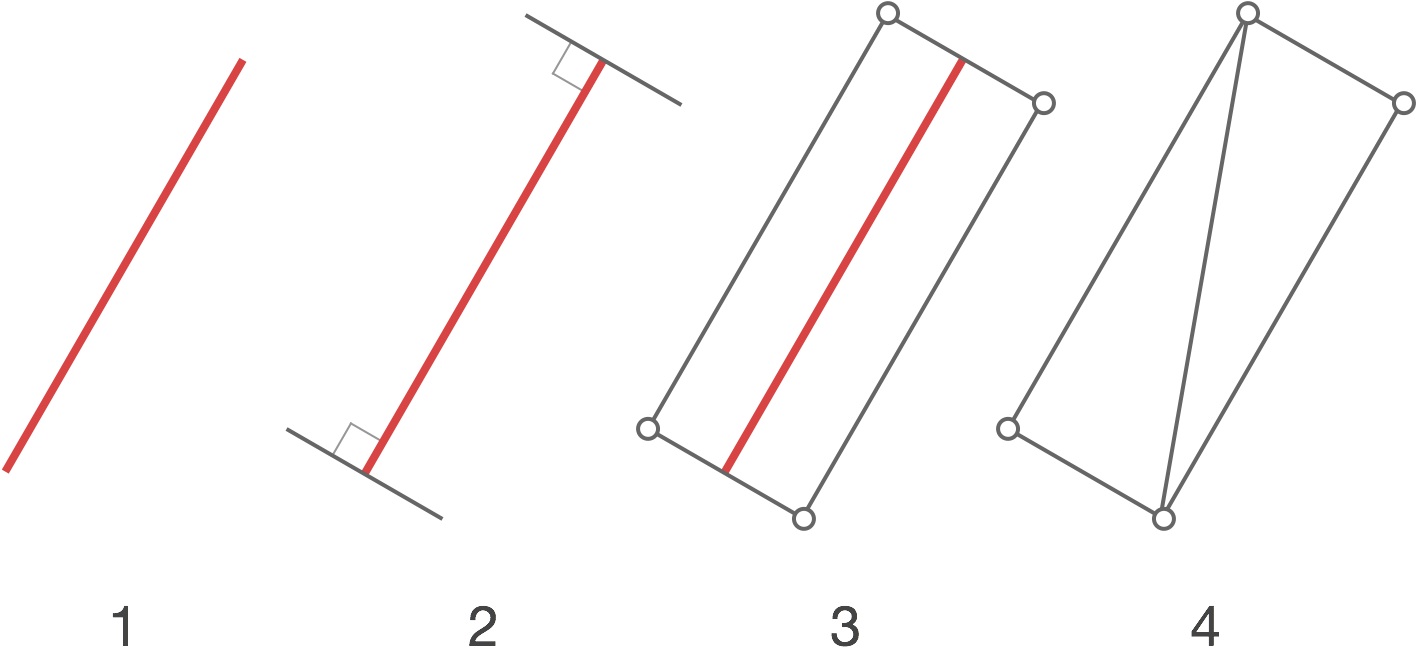
- Start with a linear segment.
- Extend it in a perpendicular direction.
- Create vertices at new endpoints.
- Connect them to create two triangles.
While this high-level overview sounds relatively simple, the devil, as usual, is in the details.
The Perpendicular
Given a vector, finding a vector perpendicular to it is one of the easiest trick in vector math. Just exchange the coordinates and negate one of them. That’s it:
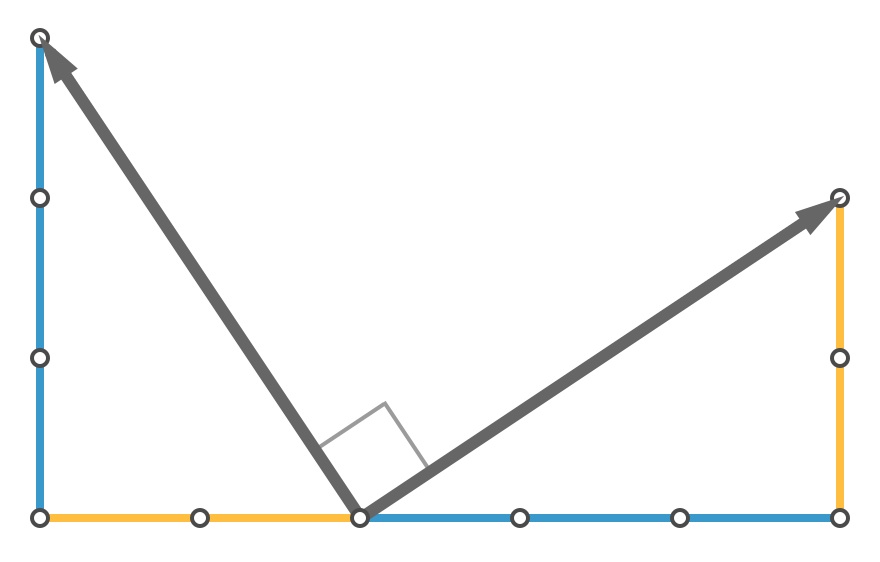
Perpendicular vector has its coordinates flipped and one of them is negated
Having the perpendicular direction makes it easy to calculate the positions of vertices that will get further used for triangles rendering.
The Bad Tangent
We’re just one step short of rendering the Bézier curve with some width. Unfortunately, making the straight line segments wider by applying the above-mentioned perpendicularity wouldn’t work well. Try making V-shape again and notice the discontinuities:
The problem is we’re treating the linear segments as independent entities, forgetting that they are part of the curve.

Two rectangular segments create cracks
While we could somehow merge the vertices in the midpoint, this wouldn’t be perfect. Since Bézier curves are defined in pristine mathematical terms we can get the vertex position much more precisely.
The Good Tangent
What’s wrong in the above approach is that we’re ignoring the fact that a curve is, well, a curve. As mentioned before, to get direction perpendicular to the direction of the curve we have to calculate the actual local direction of the curve itself. In other words, if we were to draw an arrow at the given point of the curve showing its local direction, which way should the arrow point? What’s the tangent at this point?
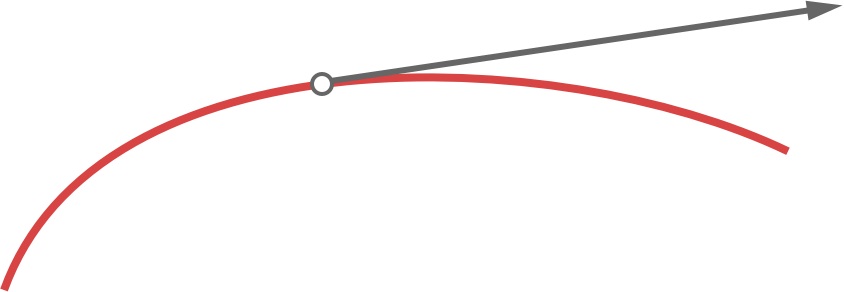
A tangent vector
Derivatives come to the rescue. Since a Bézier curve is parametrized in terms of t in a form of x(t) and y(t), we can simply derive the equations with respect to t. I won’t bother you with the equations, you can look up the exact solution directly in the source code.
With the tangent vector in hand it’s just the matter of generating the correct positions of vertices:

Correct segments have their vertices connected
Having derived the exact direction of a curve at a given point, we can generate the exact perpendicular direction finally receiving the exact position of the vertex:
Notice that for small number of segments the tight curves look really weird. This is actually easy to explain – for sufficiently long segments, the tangent vector may vary greatly, thus the surplus width may be added in completely different directions. However, when the segments are small enough it’s really difficult for the tangent vector to mess things up.
Auto-Segmentation
At this point we’ve almost recreated the line drawing technique used in Revolved. For the final step we’re not going to add anything new to our drawing routine. Instead, we’re going to reduce the interaction complexity. We’re going to get rid of the slider.
The purpose of the slider is to define how many segments should the curve be split into. We don’t want to stick in a single large value and call it a day. Rendering a few dozen triangles for even the shortest segment is surely a waste. Instead, we’re going to figure out a way to automatically calculate the number of required segments.
Estimating Length
If you look closely at a Bézier curve you’ll notice that its shape always resembles the shape of line connecting all four control points.
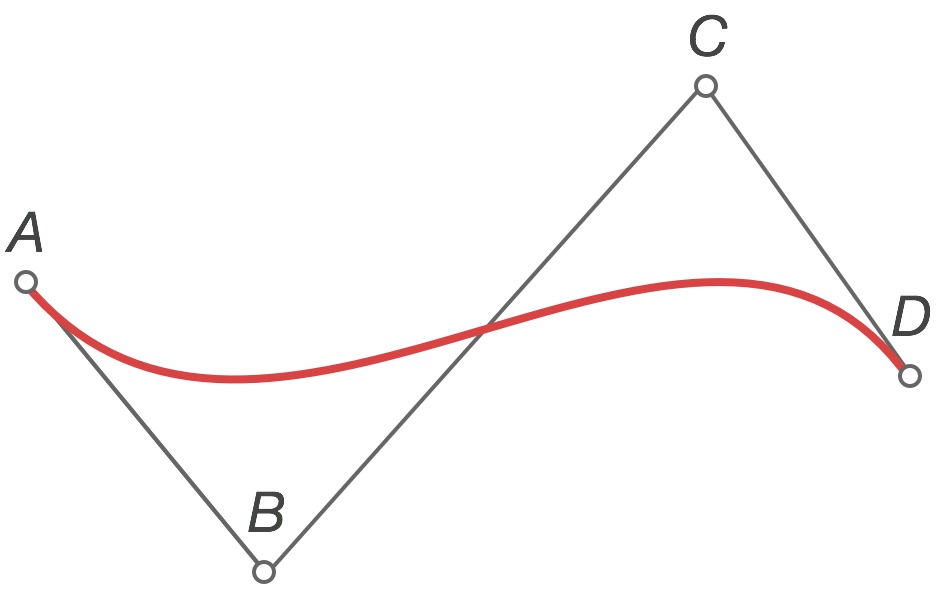
Curve’s shape resembles the line connecting control points
The length of the curve is never longer than the length of the connecting polyline. Calculating the total length of AB, BC, and CD segments we derive an upper bound for curve’s length:
float estimatedLength = (GLKVector2Length(GLKVector2Subtract(b, a)) +
                         GLKVector2Length(GLKVector2Subtract(c, b)) +
                         GLKVector2Length(GLKVector2Subtract(d, c)));
As you might have noticed, I’m using Apple’s GLKit for the vector operations. While most parts of GLKit quickly become too primitive for any serious OpenGL programming, the math part of GLKit is wonderful. The only real drawback is its verbosity, but this is something most Cocoa devs should be used to.
Estimating number of segments
Having calculated the estimated length it’s just a matter of getting the number of segments required to display a curve. While we could simply divide the estimated length and take the ceil of the value, it would mean that for very short curves we could end up with only one or two segments. Instead, we should opt for slightly biased function that will boost smaller input values. We’re going to pick hyperbola – it’s just so awesome:
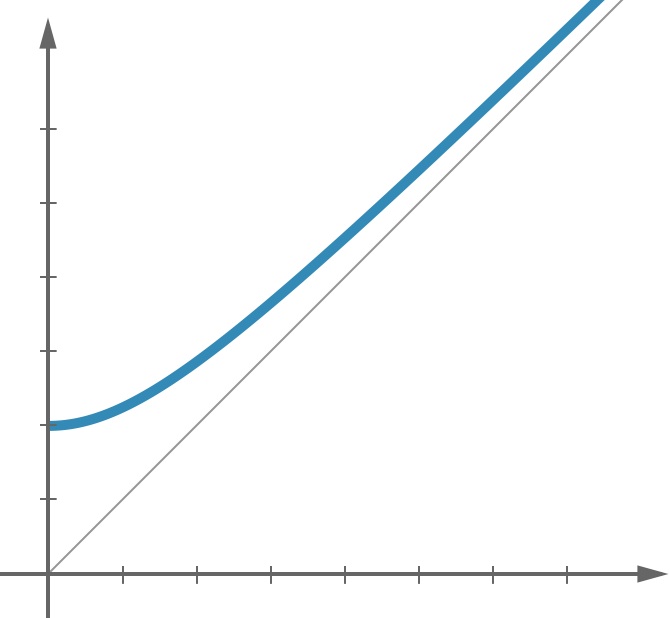
Hyperbola
For small input values hyperbola bumps the output value, for large input values the function is asymptotically similar to plain old linear function. A few minutes spend on parameters tweaking crafts the final solution. Notice how the number of knots changes when the curve gets longer or shorter:
Block Based Subdivider
While writing Revolved I’ve found yet another great application for Objective-C blocks. Instead of passing the model object through the rendering system, I’ve opted for using a subdivider block. Given a value of t (the same one that parametrizes the curve), it returns the SegmentSubdivision which is a struct that defines both position and perpendicular vector at a given point of the curve. Naturally, the block is a typedef. I don’t seem to be the only one who has problems remembering block syntax.
typedef struct SegmentSubdivision {
    GLKVector2 p;
    GLKVector2 n;
} SegmentSubdivision;

typedef SegmentSubdivision (^SegmentDivider)(float t);
The line mesh generator can then utilize the passed block to generate the vertex positions:
for (int seg = 0; seg <= segmentsCount; seg++) {

	SegmentSubdivision subdivision = subdivider((double)seg/(double)segmentsCount);
	v[0] = GLKVector2Add(subdivision.p, GLKVector2MultiplyScalar(subdivision.n, +_lineSize /2.0f));
	v[1] = GLKVector2Add(subdivision.p, GLKVector2MultiplyScalar(subdivision.n, -_lineSize /2.0f));
	...
}
Why not Core Graphics?
Having read all that you might be wondering: why bother with OpenGL drawing at all? The obvious choice for any seasoned iOS developer would be enrolling Core Graphics and drawing the curves using its functions. Let’s discuss the options I could have used.
For the stage setting purpose I should note that Revolved is currently limited to 60 curves and the drawing area of the app has dimensions of 448x768 points (896x1536 pixels on a retina device).
A Single Layer for all the Curves
The first Quartz-based solution is quite obvious – a single view with custom - drawRect: implementation. Whenever user drags anything, the entire view would have to be redrawn. Segment deletion? Redraw the entire thing. A single animation? Redraw the entire thing, 60 times per second.
Good luck pulling off redrawing that many segments that fast and that often. Did I mention that the rasterization of Core Graphics calls happens on the CPU, not on the GPU (Apple Dev account required)?
One Layer per Curve
A single view is definitely not a good idea. Alternatively I could dedicate a single view per segment.
First of all, let’s consider the memory requirements. Each pixel has four 8-bits components (RGBA). Storing the data drawn in - drawRect: for each curve would take a total of 60*896*1536*4 bytes, that is 315 MB! Even though modern iPads are capable of handling those huge RAM demands, we still have to draw a 3D model. Adding space for OpenGL buffers doesn’t really help.
Secondly, the overdraw is huge. Since layers have to be transparent, every pixel on the right side of the screen is overdrawn up to 60 times. In total, the GPU has to push over 26 full-screens worth of pixels, at 60 frames per second. This is not something you want in your app.
Optimizations
I tested these approaches on the latest & greatest iPad Air and the stuttering was absolutely abysmal.
The performance of both methods could be improved by implementing various optimizations, mostly in terms of keeping the redrawn areas small. This would require huge amounts of code that would dynamically resize the views, clip the Bézier paths and do other crazy tricks, just with an expectation of making things better. All those efforts would still become worthless for curves covering the entirety of the drawing area.
Drawing dozens of animated curves, as it exists in Revolved, is a case in which the abstractions starts to leak, forcing the programmer to fight against the clean, high-level API to do the work that could be done on a lower level much more efficiently.
Throwing Stuff at GPU
Revolved features 3D models, so it was obvious that some parts of the app would rely on OpenGL. Generating models' meshes required converting the abstract, mathematical notion of Bézier curves into concrete set of vertices and faces. This got me thinking – if I already have to go through the trouble of transforming the Béziers into the vertex representation of 3D models, why not to enroll the same process for 2D lines? This was an important reason for going the GPU way.
The crucial factor for choosing OpenGL is that it made the animation and interaction possibilities endless. Some of the line effects I’ve implemented and/or had in mind would simply be next to impossible to craft using Core Graphics.
Final Words
Cushioned with easy to use, high level API one often ignores the underlying concepts and nitty-gritty details of how stuff works. Consciously depriving myself of Core Graphics conveniences forced me to think about drawing Bézier curves in terms of “how?”. Understanding the mathematical foundations guiding the drawn shapes is something worth going through, even just for the sake of curiosity.
The presented method is not the state of the art. There are actually more complex and robust methods of drawing the curves, but the solution implemented in Revolved fits the purpose completely (the fact that I found the linked resource just a few days ago certainly didn’t help).
As for the rendering implementation, OpenGL was the right choice. While some less important elements of Revolved like buttons, tutorial and credits panels are UIKit based, the essential part of the application runs entirely in OpenGL. This is still not a full Brichter, but writing an app this way was an absolute joy.
If you get bored dissecting the Bézier curves I encourage you to try playing with them, this time in 3D, on your iPad.