Mesh Transforms
I’m a huge fan of the transform property. Combining rotations, translations, and scalings is one of the easiest way to modify a shape of a UIView or a CALayer. While easy to use, regular transforms are quite limited in what they can achieve – a rectangular shape of a layer can be transformed into an arbitrary quadrilateral. It’s nothing to sneeze at, but there are much more powerful toys out there.
This article is focused on mesh transforms. The core idea of a mesh transform is very straightforward: you introduce a set of vertices in the layer then you move them around deforming the entire contents:
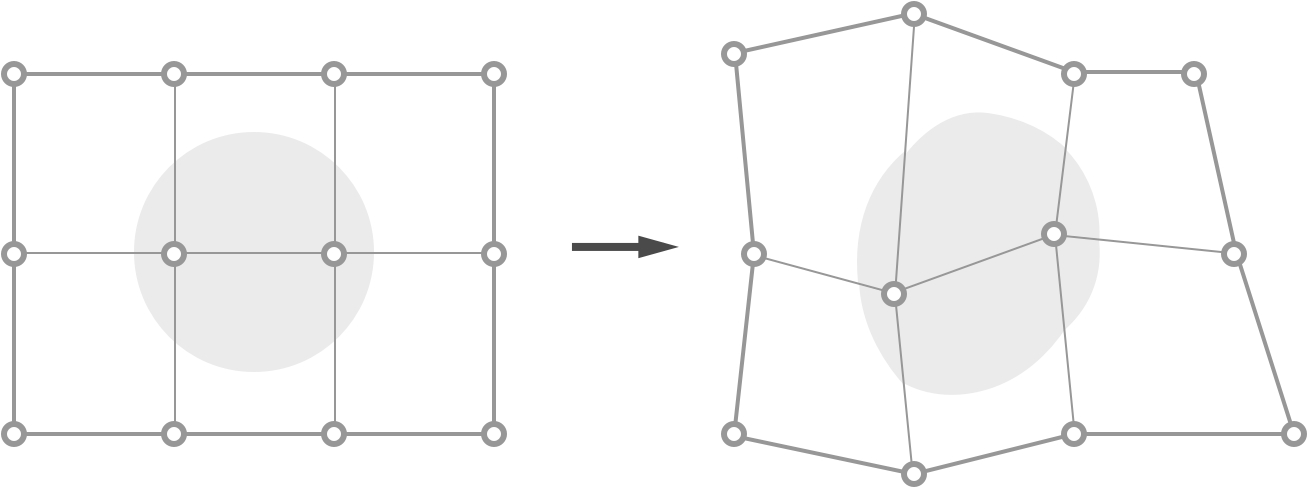
A mesh transform
The major part of this post is dedicated to a private Core Animation API that’s been part of the framework since iOS 5.0. If at this point you’re leaving this page to prevent spoiling your mind with deliciousness of private API, fear not. In the second section of the article I present an equivalent, open-sourced alternative.
CAMeshTransform
The first time I saw iOS-runtime headers I was mesmerized. The descriptions of so many private classes and hidden properties were extremely eye-opening. One of my most intriguing findings was CAMeshTransform class and a corresponding meshTransform property on CALayer. I badly wanted to figure it all out and recently I finally did. While seemingly complex, the concepts behind a mesh transform are easy to grasp. Here’s how a convenience construction method of CAMeshTransform looks like:
+ (instancetype)meshTransformWithVertexCount:(NSUInteger)vertexCount
                                    vertices:(CAMeshVertex *)vertices
                                   faceCount:(NSUInteger)faceCount
                                       faces:(CAMeshFace *)faces
                          depthNormalization:(NSString *)depthNormalization;
This method clearly describes the basic components of a CAMeshTransform – vertices, faces, and a string describing depth normalization. We will tackle these components one by one.
Disclaimer: unfortunately, names of fields inside a struct are lost during compilation so I had to come up with reasonable descriptions on my own. While original names are most likely different, their intention remains the same.
A Vertex
CAMeshVertex is a simple struct with two fields:
typedef struct CAMeshVertex {
    CGPoint from;
    CAPoint3D to;
} CAMeshVertex;
CAPoint3D is very similar to a regular CGPoint – it’s trivially extended by a missing z coordinate:
typedef struct CAPoint3D {
    CGFloat x;
    CGFloat y;
    CGFloat z;
} CAPoint3D;
With that in mind the purpose of a CAMeshVertex is easily inferred: it describes the mapping between the flat point on the surface of a layer and the transformed point located in a 3D space. CAMeshVertex defines the following action: “take this point from the layer and move it to that position”. Since CAPoint3D field has x, y, and z components, a mesh transform doesn’t have to be flat:
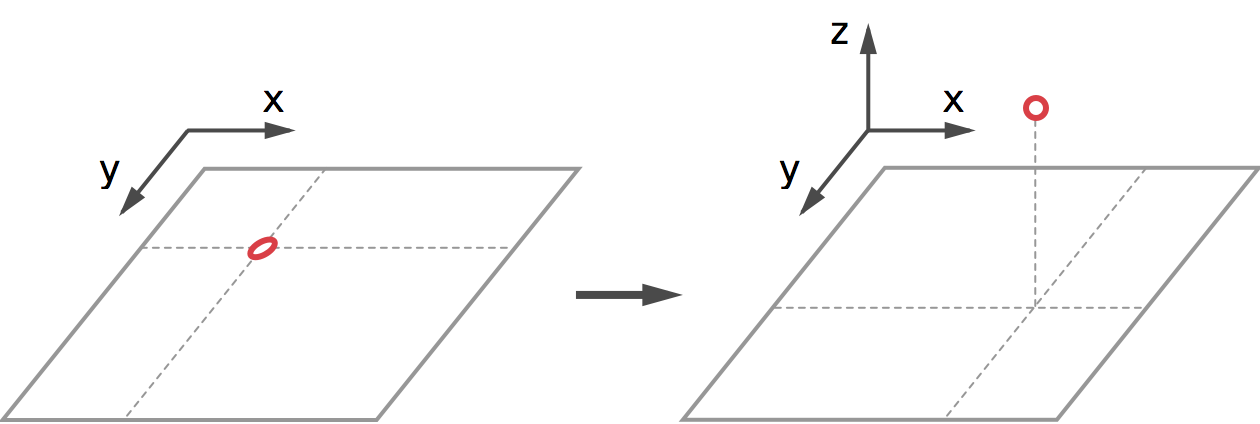
A vertex moves from a 2D point on a layer to a 3D point in a space
A Face
CAMeshFace is simple as well:
typedef struct CAMeshFace {
    unsigned int indices[4];
    float w[4];
} CAMeshFace;
The indices array describes which four vertices a face is spanned on. Since CAMeshTransform is defined by an array of vertices, a CAMeshFace can reference vertices it’s built with by their indexes in vertices array. This is a standard paradigm in computer graphics and it’s very convenient – many faces can point at the same vertex. This not only removes the problem of data duplication, but also makes it easy to continuously modify the shape of all the attached faces:
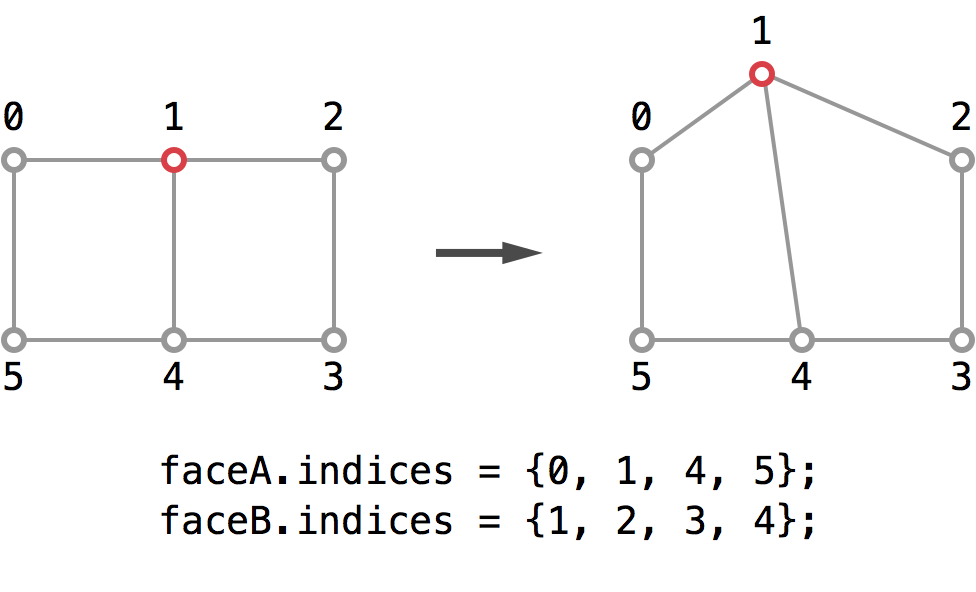
Faces are defined by their vertices
As for the w field of CAMeshFace, we’ll temporarily postpone its discussion.
Coordinates
With an overview of the vertices and faces at hand it’s still not obvious what values should we put inside a CAMeshVertex. While the vast majority of CALayer’s properties are defined in points, there are a few that make use of unit coordinates, the anchorPoint being probably the most popular one. CAMeshVertex makes use of unit coordinates as well. The from point of {0.0, 0.0} corresponds to a top left corner of the layer and {1.0, 1.0} point corresponds to bottom right corner of the layer. The to point uses exactly the same coordinate system:
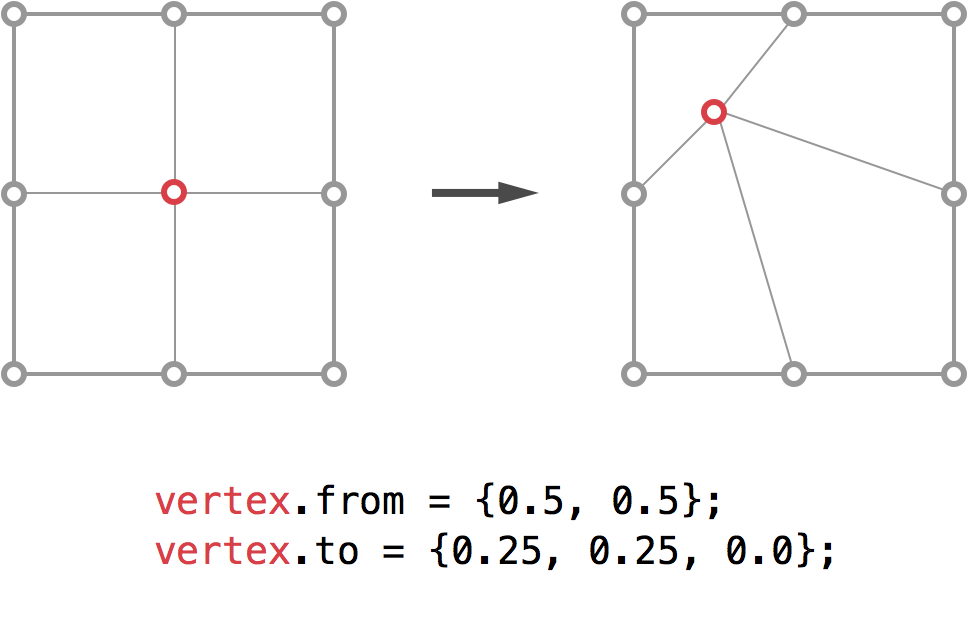
Vertices are defined in unit coordinates
The reason for using unit coordinates is introduced in Core Animation Programming Guide:
Unit coordinates are used when the value should not be tied to screen coordinates because it is relative to some other value.
The best thing about unit coordinates is that they’re size invariant. You can reuse the exact same mesh to transform both small and large views and it will all work just fine. I believe this was the main reason for choosing them as units of CAMeshTransform.
Modifying Mesh Transforms
One of the drawbacks of creating a regular CAMeshTransform is that it’s immutable and all the vertices and faces have to be defined before the transform is created. Thankfully, a mutable subclass named CAMutableMeshTransform also exists and this one does allow adding, removing and replacing vertices and faces at any time.
Both mutable and immutable mesh transform have a subdivisionSteps property that describes how many mesh subdivisions should be performed by the framework when layer gets rendered on screen. Number of splits grows exponentially, so setting the value of property to 3 will divide each edge to 8 pieces. The default value of subdivisionSteps is −1 and it usually makes the meshes look smooth. I assume it tries to automatically adjust the number of subdivisions to make the final result look good.
What’s not obvious, for non 0 values of subdivisionSteps generated mesh doesn’t go through all of its vertices:
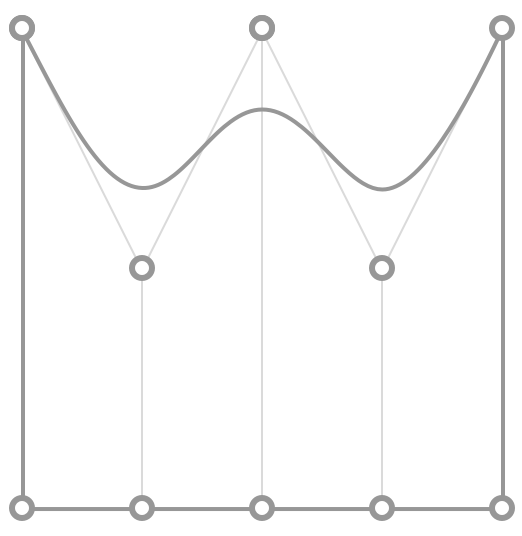
Shape of subdivided mesh vs its vertices
In fact, the vertices are control points of a surface and by observing how they influence the shape I suspect CAMeshTransform actually defines a cubic NURBS surface. Here’s where w field of CAMeshFace comes back. Setting a value at one of the four indices of the w array seems to influence the weight of the corresponding vertex. The factor doesn’t seem to be the weight as defined in NURBS equation. Unfortunately, I couldn’t force myself to get through literally hundreds lines of floating point assembly to figure out what’s going on.
Even though NURBS surfaces are extremely powerful, the fact that they don’t go through the defining vertices is quite a kicker. When I was designing my meshes I wanted to have total control over what’s going on and how the generated mesh looked like so I usually set subdivisionSteps property to 0.
Applying Mesh Transform
On its own CAMeshTransform is of little use, but it can be easily assigned to a private property of a CALayer:
@property (copy) CAMeshTransform *meshTransform;The following piece of code creates a wavy mesh transform. It’s excessively verbose for the purpose of demonstrating how all the pieces fit together. With a bunch of convenience methods, the same effect can be created within literally a few lines of code.
|
|
Here’s a UILabel with a mesh transform applied:
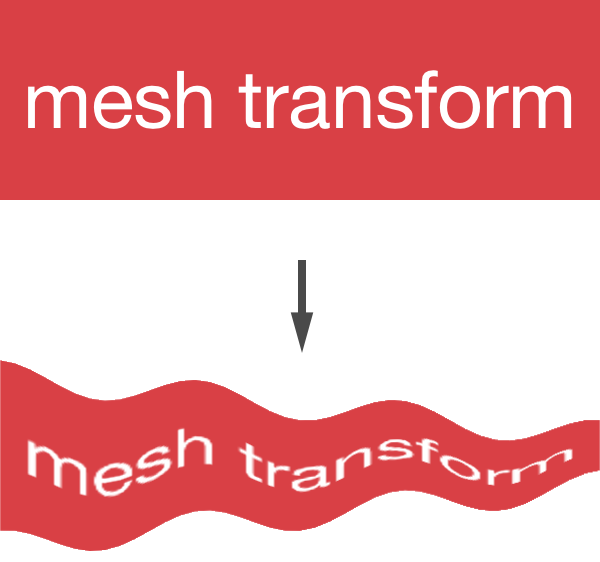
Mesh-transformed UILabel
It’s worth pointing out that you might often see different results depending on whether the app is run on a simulator or on a device. Apparently, the iOS simulator version of Core Animation uses a software renderer for its 3D stuff and it’s a different software renderer than the one used for OpenGL ES. This is especially visible with patterned textures.
Leaky Abstractions
When you look closer at the mesh-transformed UILabel on a retina device, you’ll notice that its text quality is subpar. It turns out it can be easily improved with a single property assignment:
label.layer.rasterizationScale = [UIScreen mainScreen].scale;This is a giveaway of how it all might work under the hood. The contents of layer and all its sublayers get rasterized into a single texture that later gets applied to the vertex mesh. In theory, the rasterization process could be avoided by generating the correct meshes for all the sublayers of the transformed layer by making them perfectly overlap their respective superlayers. In general case, however, vertices of the sublayers would be placed in-between vertices of the parent layer which would surely cause a nasty z-fighting. Rasterization looks like a good solution.
The other problem I noticed has its roots in hardware. CAMeshTransform provides a nice abstraction of a face which is nothing more than a quadrilateral, also known as a quad. However, modern GPUs are only interested in rendering triangles. Before it is sent to the GPU a quad has to be split into two triangles. This process can be done in two distinct ways by choosing either diagonal as a separating edge:
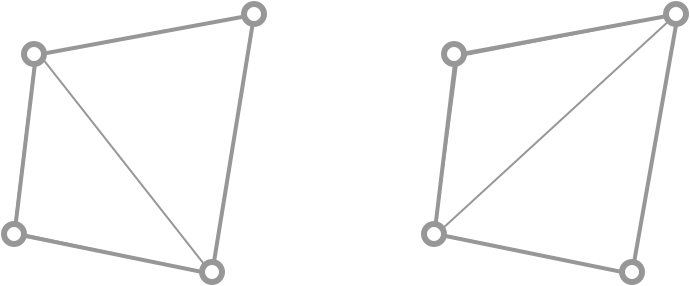
Two different divisions of the same quad into triangles
It might not seem like a big deal, but performing a seemingly similar transform can produce vastly different results:
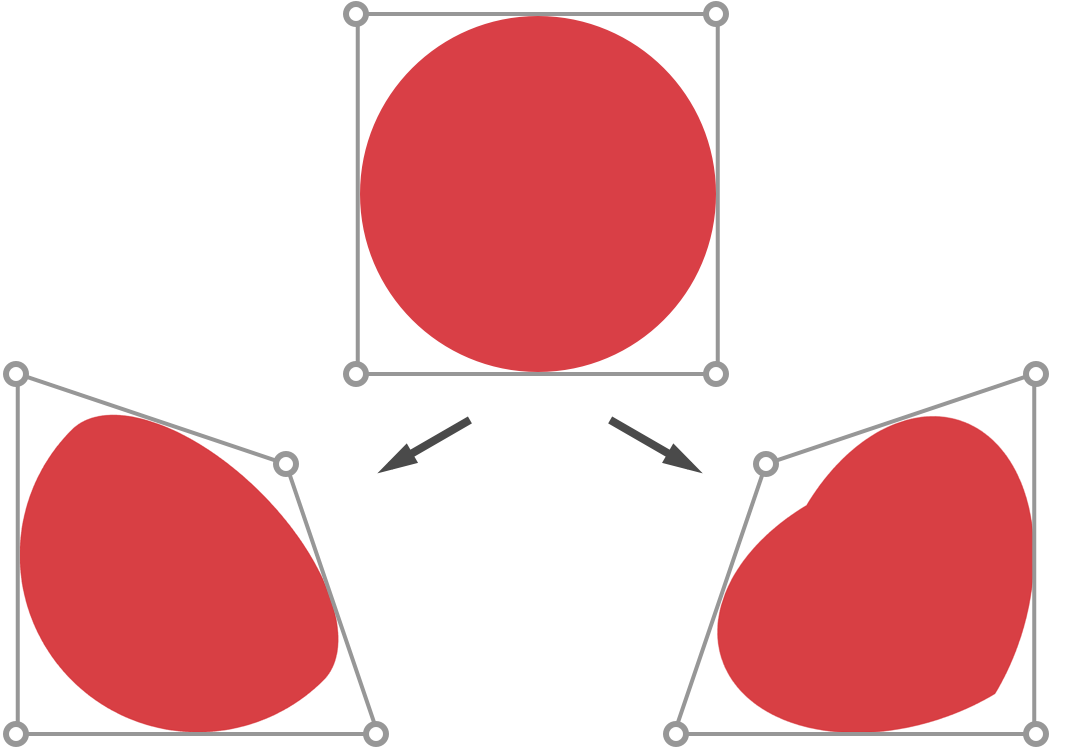
Symmetrical meshes, asymmetrical results
Notice that the shapes of mesh transforms are perfectly symmetrical, yet the result of their action is not. In the left mesh only one of the triangles actually gets transformed. In the right mesh both triangles do. It shouldn’t be hard to guess which diagonal does Core Animation use for its quad subdivision. Note that the effect will also happen for the exact meshes if you change the order of indices inside their respective faces.
Even though the small issues caused by rasterization and triangulation are leaky abstractions and can’t be completely ignored, they seem to be the only viable solutions to the complexity they try to mask.
Adding Depth
The unit coordinates are a neat idea and they work great for both width and height. However, we don’t have any way to define the third dimension – a size field of layer’s bounds has merely two dimensions. One unit of width is equal to bounds.size.width points and height works correspondingly. How can one specify how many points does one unit of depth have? Authors of Core Animation have solved this problem in a very simple but surprisingly effective way.
A depthNormalization property of CAMeshTransform is an NSString that can legally by set to one of the six following constants:
extern NSString * const kCADepthNormalizationNone;
extern NSString * const kCADepthNormalizationWidth;
extern NSString * const kCADepthNormalizationHeight;
extern NSString * const kCADepthNormalizationMin;
extern NSString * const kCADepthNormalizationMax;
extern NSString * const kCADepthNormalizationAverage;
Here’s the trick: CAMeshTransform evaluates the depth normalization as a function of the other two dimensions. The constant names are self-explanatory, but let’s get through a quick example. Let’s assume the depthNormalization is set to kCADepthNormalizationAverage and the layer bounds are equal to CGRectMake(0.0, 0.0, 100.0, 200.0). Since we picked the average normalization, one unit of depth will map to 150.0 points. A CAMeshVertex with to coordinates of {1.0, 0.5, 1.5} will map to a 3D point with coordinates equal to {100.0, 100.0, 225.0}:
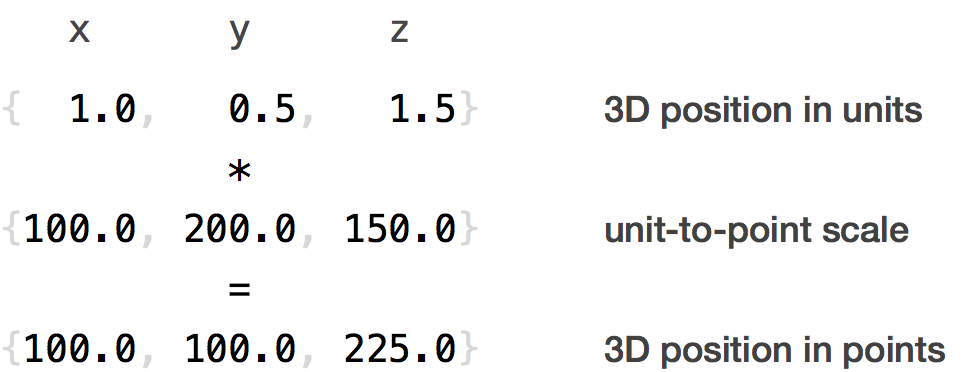
Converting from units to points
Why go through the trouble of converting unit coordinates to points? It’s because of a transform property of a CALayer and its type – CATransform3D. Components of CATransform3D are defined in terms of points. You can actually apply any transform to the layer itself and it will influence its vertices as well. The z coordinate translation and a perspective transform come to mind as a major beneficiaries of this feature.
At this point we could create another example, this time with depthNormalization not equal to the default kCADepthNormalizationNone. The results would be quite disappointing – everything would look flat. The depth added by non-zero z coordinates of vertices is very unconvincing. We can skip this step altogether and add a missing component that would emphasize the slopes and curvatures of the mesh – the shading.
Meeting Prometheus
Since we’ve already opened Pandora’s box of private Core Animation classes, we might as well use another one. At this point it should come as no surprise that a class named CALight exists and it’s actually very useful since CALayer has a private, NSArray-typed lights property.
A CALight is created with + (id)lightWithType:(NSString *)lightType convenience method and the lightType argument can be one of the following four values:
extern NSString * const kCALightTypeAmbient;
extern NSString * const kCALightTypeDirectional;
extern NSString * const kCALightTypePoint;
extern NSString * const kCALightTypeSpot;
I’m not going to discuss CALight in details, so let’s jump straight to an example. This time we’re going to use two hand-made CAMutableMeshTransform convenience methods. The first one, identityMeshTransformWithNumberOfRows:numberOfColumns:, creates a mesh with uniformly spread vertices that don’t introduce any disturbances. Then we’re going to modify those vertices by mapVerticesUsingBlock: method that maps all vertices to some other vertices.
|
|
And here’s the result of applying the code to a square UILabel:
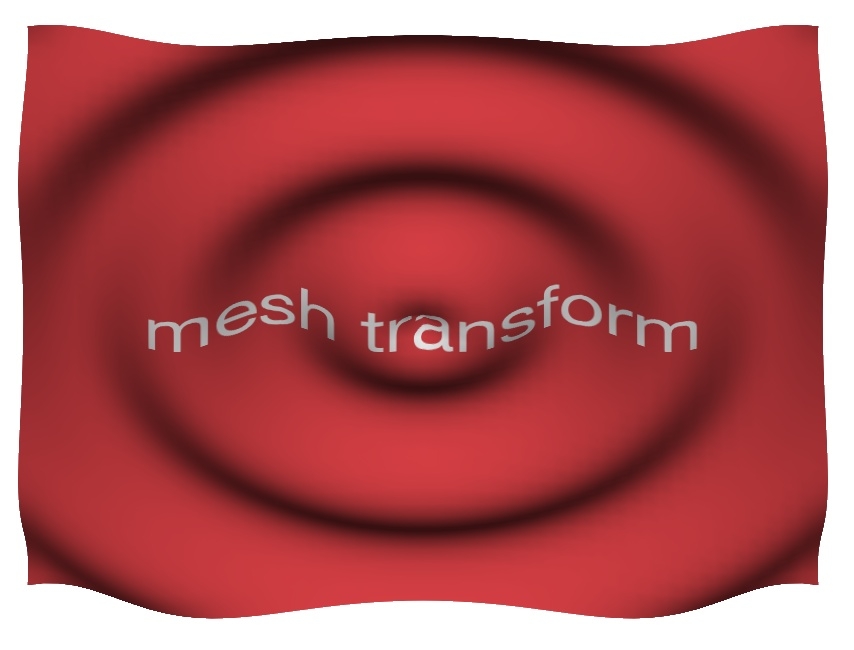
CALight, CAMeshTransform, and CATransform3D all working together
While the lighting looks a little bit cheesy, it certainly is impressive how easy it is to do quite complex effects.
CALight seems to have tunable ambient, diffuse and specular intensities – a standard set of coefficients of Phong reflection model. Moreover, CALayer has corresponding surface reflectance properties. I played with these for a few minutes and I didn’t really get anywhere, but I cleaned-up the private headers so it should be much easier to test the lighting capabilities of Core Animation.
Private for a Reason
One of the most important reasons for keeping an API private is that it doesn’t have to be bullet proof and CAMeshTransform certainly is not. There are a few ways to get hurt.
To begin with, assigning 20 to subdivisionSteps property is probably the easiest way to programmatically reboot your device. A set of memory warnings spilled into console is a clear indication of what’s going on. This is certainly annoying, but can be easily avoided – don’t touch the property or set it to 0.
If one of the faces you provide is degenerated, e.g. all of its indices point to the same vertex, you will hang your device. Everything will stop working, including the hardware buttons (!) and only a hard restart will help (long press home + power buttons). The framework doesn’t seem to be prepared for malformed input.
Why do these problems happen? It’s because of the backboardd – a process that is, among other activities, acting as a render server for Core Animation. Technically, it’s not the app itself that makes the system crash, it’s the indirect misuse of one of the core components of iOS that causes all the troubles.
Missing Features
The idea of a general purpose mesh-transformable layer is complex enough that Core Animation team had to cut some corners and skip some of the potential features.
Core Animation allows mesh-transformed layers to have an alpha channel. Rendering semitransparent objects correctly is not a trivial problem. It’s usually done with a Painter’s algorithm. The z-sorting step is not hard to implement and indeed the code does seem to execute a radix sort call which is quite clever, since floats can be sorted with radix sort as well. However, it’s not enough to sort the triangles as some of them may overlap or intersect.
The usual solution to this problem is to divide the triangles so that all the edge cases are removed. This part of the algorithm seems to be not implemented. Granted, correct & good-looking meshes should rarely overlap in a tricky way, but sometimes it does happen and the mesh-transformed layer may look glitchy.
Another feature that’s been completely ignored is hit testing – the layer behaves as if it hasn’t been mesh-transformed at all. Since neither CALayer’s nor UIView’s hitTest: method are aware of mesh, the hit test area of all the controls will rarely match their visual representation:
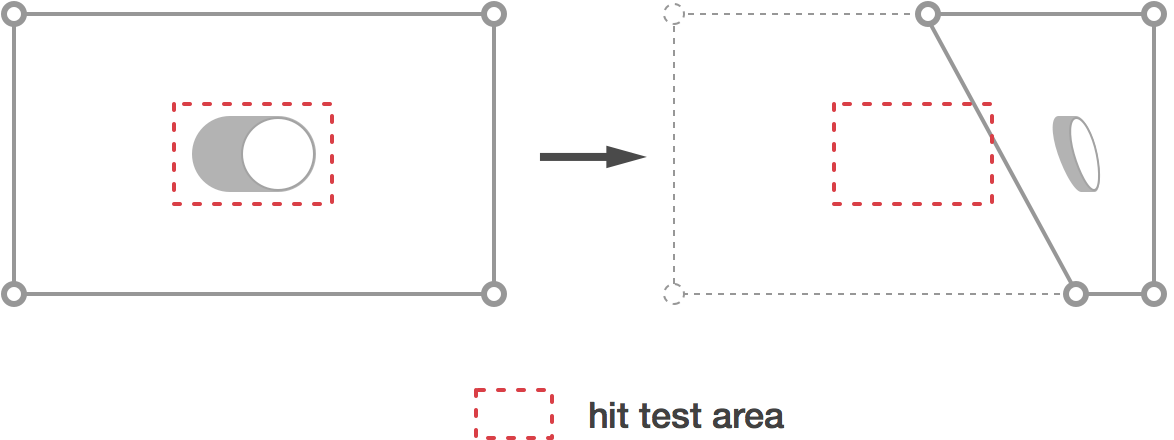
Hit test area of an embedded UISwitch is not affected by a mesh transform
The solution to this problem would be to shoot a ray through the space, figure out which triangle has been hit, project the hit point from the 3D space back into the 2D space of the layer and then do the regular hit testing. Doable, but not easy.
Replacing Private API
Taking into account all the drawbacks of CAMeshTransform one could argue it’s a faulty product. It’s not. It’s just amazing. It opens up the entire new spectrum of interaction and animation on iOS. It’s a breath of fresh air in a world of plain old transforms, fade-ins and blurs. I badly wanted to mesh-transform everything, but I can’t consciously rely on that many lines of private API calls. So I wrote an open-sourced and very closely matching replacement.
In the spirit of CAMeshTransform I created a BCMeshTransform which copies almost every feature of the original class. My intention was clear: if CAMeshTransform ever ships, you should be able to use the exact same mesh transforms on any CALayer and achieve extremely similar, if not exact, results. The only required step would be to find and replace BC class prefix with CA.
With a transform class in hand the only thing that’s missing is a target of a mesh transform. For this purpose I created a BCMeshTransformView, a UIView subclass that has a meshTransform property.
Without direct, public access to Core Animation render server I was forced to use OpenGL for my implementation. This is not a perfect solution as it introduces some drawbacks the original class didn’t have, but it seems to be the only currently available option.
A Few Tricks
When I was creating the classes I encountered a few challenges and it probably won’t hurt to discuss my solutions to these problems.
Animating with UIView Animation Block
It turns out it’s not that hard to write a custom animatable property of any class. David Rönnqvist has pointed out in his presentation on UIView animations that a CALayer asks its delegate (a UIView owning the layer) for an action when any of its animatable properties is set.
If we’re inside an animation block then UIView will return an animation as a result of an actionForKey:method call. With a CAAnimation in hand we can check its properties to figure out what animation parameters does the block based animation have.
My initial implementation looked like this:
|
|
I quickly realized it was an invalid approach – the completion callback did not fire. When a block based animation is made, UIKit creates an instance of UIViewAnimationState and sets it as a delegate of any CAAnimation created within the block. What I suspect also happens, UIViewAnimationState waits for all the animations it owns to finish or get cancelled before firing the completion block. Since I was obtaining the animation just for the purpose of reading its properties, it hasn’t been added to any layer and thus it never finished.
The solution for this problem was much less complicated than I expected. I added a dummy view as a subview of BCMeshTransformView itself. Here’s the code I’m currently using:
|
|
The double opacity assignment is needed to ensure the property changes it value. The animation will not be added to a layer if it’s already in the destination state. Moreover, a layer has to be in a view hierarchy of any UIWindow, otherwise its properties won’t get animated.
As for animating the meshes themselves, it’s possible to force Core Animation to interpolate any float values by packing them in NSNumber, shoving them into NSArray, implementing needsDisplayForKey: class method and responding to presentation layer changes inside setValue:forKey: method. While very convenient, this approach has some serious performance issues. Meshes with 25x25 faces were not animated with 60 FPS, even on the iPad Air. The cost of packing and unpacking is very high.
Instead of pursuing the Core Animation way, I used a very simple animation engine powered by CADisplayLink. This approach is much more performant, handling 100x100 faces with butter smooth 60 FPS. It’s not a perfect solution, we’re loosing many conveniences of CAAnimation, but I believe the 16x speed boost is worth the trouble.
Rendering Content
The core purpose of BCMeshTransformView is to display its mesh-transformed subviews. The view hierarchy has to be rendered into a texture before its submitted to OpenGL. The textured vertex mesh then gets displayed by GLKView which is the the main workhorse of BCMeshTransformView. This high level overview is straightforward, but it doesn’t mention the problem of snapshotting the subview hierarchy.
We don’t want to snapshot the GLKView itself as this would quickly create a mirror-tunnel like effect. On top of that, we don’t want to display the other subviews directly – they’re supposed to be visible inside the OpenGL world, not within the UIKit view hierarchy. They can’t be put beneath the GLKView as it has to be non opaque. To solve these issues I came up with a concept of a contentView, similarly to how UITableViewCell handles its user defined subviews. Here’s how a view hierarchy looks:
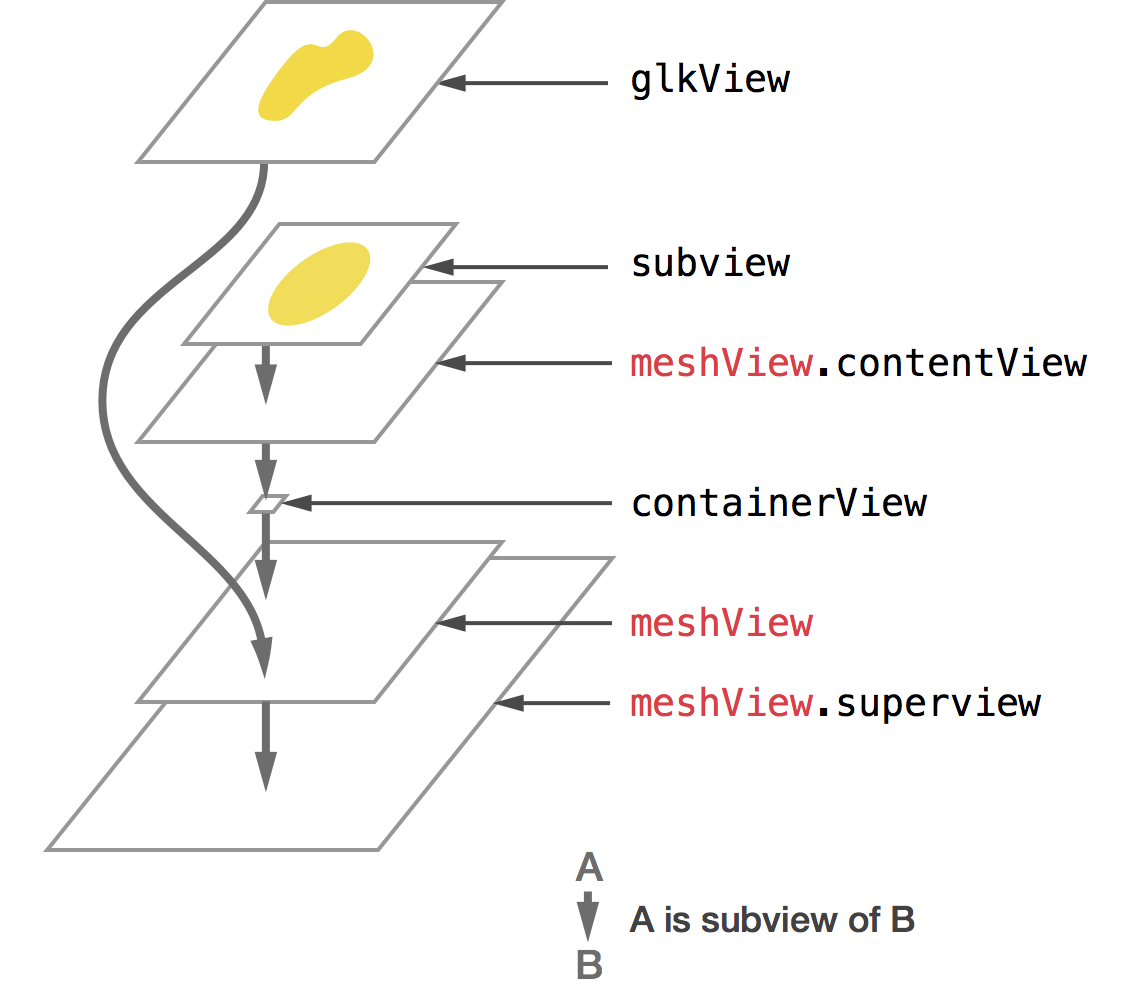
The view hierarchy of BCMeshTransformView
The contentView is embedded inside a containerView. The containerView has a frame of CGRectZero and clipsToBounds property set to YES, making it invisible to the user but still within the reach of BCMeshTransformView. Every subview that should get mesh-transformed must be added to contentView.
A content of contentView is rendered into a texture using drawViewHierarchyInRect:afterScreenUpdates:. The entire process of snapshotting and uploading texture is very fast, but unfortunately for larger views it takes more than 16 milliseconds. This is too much to render the hierarchy on every frame.
Even though BCMeshTransformView automatically observes changes of its contentView subviews and re-renders the texture on its own, it doesn’t support animations inside the meshed subviews.
Final Words
Without a doubt, a mesh transform is a fantastic concept, yet it seems so unexplored in the world of interfaces. It certainly adds more playfulness to otherwise dull screens. In fact, you can experience mesh transforms today, on your iOS device, by launching Game Center and watching the subtle deformations of bubbles. This is CAMeshTransform working its magic.
I encourage you to check out the demo app I made for BCMeshTransformView. It contains a few ideas of how a mesh transform can be used to enrich interaction, like my very simple, but functional take on that famous Dribbble. For more inspiration on some sweet meshes, Experiments by Marcus Eckert is a great place to start.
I wholeheartedly hope BCMeshTransformView becomes obsolete on the first day of WWDC 2014. The Core Animation implementation of mesh transforms has more features and is more tightly integrated with the system. Although it currently doesn’t handle all the edge cases correctly, with a bit of polishing it surely could. Fingers crossed for June 2.